Using the Norce adapter
In this tutorial, we'll learn how to configure the Norce Adapter, create a Norce Checkout order from a Norce Commerce basket, add a payment using the Non-PSP adapter, and complete the order in both Norce Checkout and Norce Commerce.
Prerequisites
Before we begin, ensure the following:
- Access to Norce Commerce.
- Payment method Norce Checkout (239) set up.
- The Non-PSP adapter configured in our channel.
Delivery
The Norce adapter can manage shippings in two ways:
- Full Control : The adapter provides Norce Checkout with the shipping option selected in Norce Commerce. In this case, the order will include shipping information based on the delivery method from Norce Commerce.
- Managed by Norce Checkout : The adapter can also allow Norce Checkout to handle shippings. This is useful if you're adding shipping manually during checkout or using an external provider, like Klarna Checkout with Klarna Shipping Assistant. In this case, the Norce adapter should use the External Delivery Method (128), and Norce Commerce will be updated based on the selection made in Norce Checkout.
For the tutorial examples we're using the following:
- A free freight is added by default to our checkout in Norce Commerce.
-
shippingChangedHookEnabledis set to true
This way, the Norce adapter does not map a shipping to our order, assuming we'll add it, and we can skip it.
Configuring the Norce Adapter
To allow the Norce adapter to fetch basket information from Norce Commerce, it needs to be aware of our client and application IDs, as well as how to obtain a token using the identity client ID and client secret.
Set shippingChangedHookEnabled to false if you're not using KSA, instead relying on delivery from Norce Commerce.
PUT /api/v1/configuration/merchants/<merchant>/channels/<channel>/configurations/norce_adapter
X-Merchant: <merchant>
X-Channel: <channel>
Authorization: Bearer <token>
Host: <slug>.api-se.playground.norce.tech/checkout/configuration
Content-Type: application/json

{
  "$schema": "https://<slug>.api-se.playground.norce.tech/checkout/norce-adapter/openapi/v1/schemas/norce_adapter.json",
  "id": "norce_adapter",
  "active": true,
  "adapter": {
    "internalUrl": "https://norce-adapter.checkout.playground.internal.norce.tech",
    "publicUrl": "https://<slug>.api-se.playground.norce.tech/checkout/norce-adapter"
  },
  "settings": {
    "clientId": <clientId>,
    "applicationId": <applicationId>
  },
  "api": {
    "identityAddress": "https://identityservice.commerce.test.internal.norce.tech/connect/token",
    "identityClientId": "<identityClientId>",
    "identityClientSecret": "<identityClientSecret>",
    "identityScope": "lab"
  },
  "application": {
    "productUrlPattern": "https://<slug>.admin-se.playground.norce.tech/product/detail/{productId}",
    "imageBaseUrl": "https://<slug>.test.cdn-norce.tech/{{commerceClientId}}"
  },
  "country": {
    "defaultCountry": "SE"
  },
  "features": {
    "shippingChangedHookEnabled": true
  }
}
Preparing a Basket in Norce Commerce
- Create a basket
- Insert a basket item
- Set payment method to 239
- Set delivery method to 128 (if you're using KSA)
Creating an Order in Norce Checkout
Instead of providing the full order details, we only need to supply the basket ID, culture, and currency.
POST /api/v1/orders
X-Merchant: <merchant>
X-Channel: <channel>
Authorization: Bearer <token>
Host: <slug>.api-se.playground.norce.tech/checkout/norce-adapter
Content-Type: application/json

{
  "cartReference": <basketId>,
  "culture": "sv-SE",
  "currency": "SEK"
}201 Created
Content-Type: application/json
{
"id": "<orderId>"
}This triggers the following sequence:
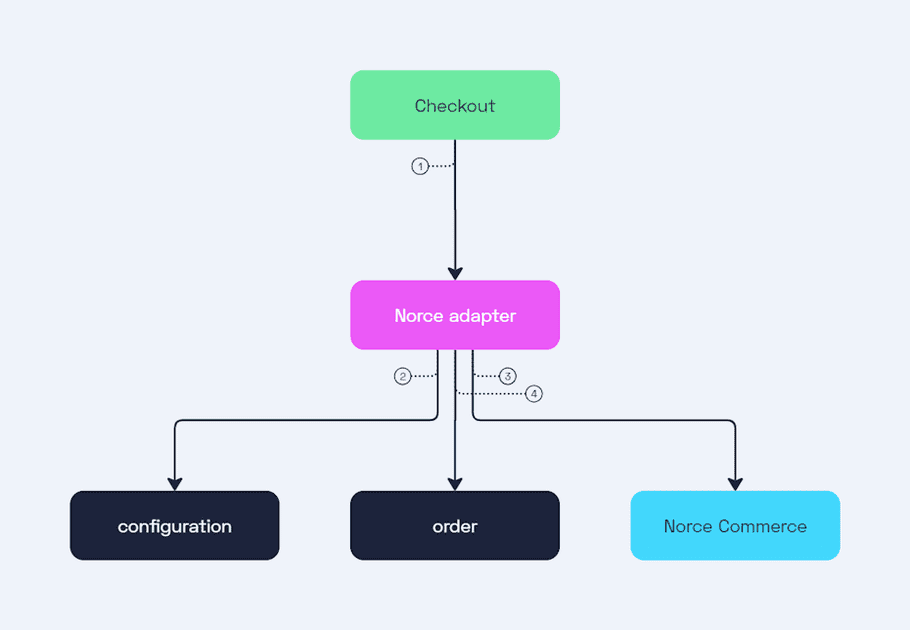
- The Checkout creates an order through the Norce adapter.
- The Norce adapter fetches its configuration.
- Using the configuration and the basket ID, the adapter retrieves the basket from Norce Commerce.
- The adapter maps the basket to a Norce Checkout order, adds hooks and notifications, and responds with an order ID.
We can fetch the order to see the full response. For readability, some parts have been omitted from the example response below, but we should find that the order contains validations, hooks, and notifications.
Validations
The validations are triggered when performing a full validation request on the entire order. Invoking this validation will ensure that the order details are correct, items are in stock and amounts are accurate.
Hooks
There are three hooks included in the order:
- Shipping Hook: This hook subscribes to changes in shipping options. It allows Norce Commerce to update the current shipping cost and potentially apply promotions based on the new total for example.
- State Hook: This hook tracks changes in order state. When transitioning from Checkout to Processing , the Norce adapter will validate the order as well as purchase and validate the Norce Checkout payment method in Norce Commerce before accepting the change.
- Customer Hook: This hook monitors customer detail updates, as changes to customer information can affect the cart.
Notifications
The order also includes a notification. This is triggered when the order reaches the Completed state, prompting the Norce adapter to complete the Norce Checkout payment in Norce Commerce.
We'll go into more detail on how hooks and notifications work in a later example.
GET /api/v0/checkout/orders/<orderId>
X-Merchant: <merchant>
X-Channel: <channel>
Authorization: Bearer <token>
Host: <slug>.api-se.playground.norce.tech/checkout/order200 OK
Content-Type: application/json
{
"id": "<orderId>",
"merchant": "<merchant>",
"channel": "<channel>",
"state": {
"currentStatus": "checkout"
},
"culture": "sv-SE",
"currency": "SEK",
"country": "SE",
"cart": {
"reference": "<basketId>",
"items": [ {} ],
"total": { },
"attributes": {
"currencyId": 2
}
},
"validations": [
{
"id": "ov1",
"adapterId": "norce_adapter",
"url": "https://norce-adapter.checkout.test.internal.norce.tech/api/v1/orders/<orderId>/validate"
}
],
"hooks": [
{
"id": "oh1",
"adapterId": "norce_adapter",
"subscribeTo": "/shippings",
"invoke": "https://norce-adapter.checkout.test.internal.norce.tech/api/v1/orders/<orderId>/shipping-changed"
},
{
"id": "oh2",
"adapterId": "norce_adapter",
"subscribeTo": "/state",
"invoke": "https://norce-adapter.checkout.test.internal.norce.tech/api/v1/orders/<orderId>/state-changed"
},
{
"id": "oh3",
"adapterId": "norce_adapter",
"subscribeTo": "/customer",
"target": "/cart",
"invoke": "https://norce-adapter.checkout.test.internal.norce.tech/api/v1/orders/<orderId>/customer-changed"
}
],
"notifications": [
{
"id": "on1",
"adapterId": "norce_adapter",
"reference": "018f1459-c8e5-7aef-a4c5-cd7a60bc7c57",
"description": "Complete payment on Completed",
"scope": "/state/currentStatus",
"schema": {
"enum": [
"completed"
]
},
"invoke": "https://norce-adapter.checkout.test.internal.norce.tech/api/v1/orders/<orderId>/export-order"
}
],
"total": { }
}Adding a Payment
We'll use the Non-PSP adapter to create a payment.
POST /api/v1/checkout/orders/<orderId>/payments
X-Merchant: <merchant>
X-Channel: <channel>
Authorization: Bearer <token>
Host: <slug>.api-se.playground.norce.tech/checkout/nonpsp-adapter201 Created
location: /api/v0/checkout/orders/<orderId>/payments/<paymentId>
Content-Type: application/json
{
"paymentId": "<paymentId>",
"paymentMethods": [
{
"identifier": "thing-payment"
},
{
"identifier": "pay-stuff"
}
],
"selectedPaymentMethod": "thing-payment"
}Updating quantity
To update the quantity of an item in our order, we can use the Norce Adapter. First, we fetch our order and note the ID of the item we want to modify. We'll need this for the request below.
PATCH /api/v1/orders/<orderId>/cart/items/<itemId>
X-Merchant: <merchant>
X-Channel: <channel>
Authorization: Bearer <token>
Host: <slug>.api-se.playground.norce.tech/checkout/norce-adapter
Content-Type: application/json

{
  "quantity": 2
}200 OKThis triggers the following sequence:
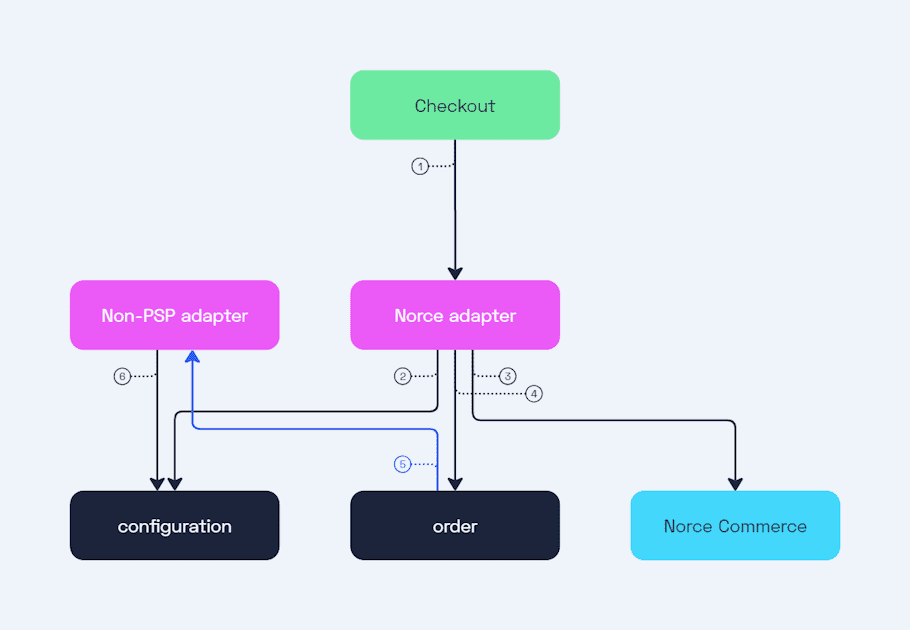
- The Checkout updates the quantity of an item through the Norce adapter.
- The Norce adapter fetches its configuration.
- The Norce adapter updates the basket in Norce Commerce and retrieves the updated version.
- The Norce adapter maps the updated basket to the Norce Checkout order cart, reflecting the increased quantity and cost, and updates it.
- The Non-PSP adapter hook on cart changes is triggered.
- The Non-PSP adapter fetches its configuration, verifies the selected payment method, and responds with a patch document, updating the payment amount to match the new order total. The order service commits all the updates.
Customer information
To complete the order, customer information must be provided. If this step is skipped, the following sequence will be triggered:
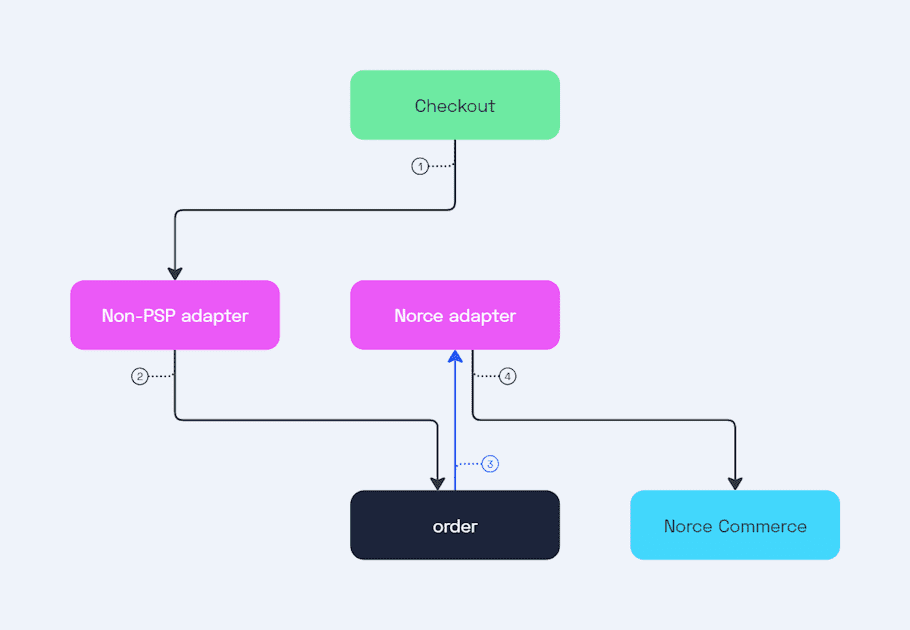
- The Checkout completes the payment through the Non-PSP adapter.
- The Non-PSP adapter updates the order state to Processing .
- The Order service calls the Norce adapter state change hook.
- The Norce adapter attempts to initiate the payment in Norce Commerce but encounters a validation error due to missing customer information. The hook is rejected with a validation error, preventing the order service from committing the state change and returning a bad request to the caller with the error message.
Adding customer information
Customer information can be added in one of two ways:
-
In Norce Commerce
: By using the
UpdateBuyerendpoint in the Shipping Service. - In Norce Checkout : By updating the customer information directly in the order.
Any time a change is made in Norce Commerce—whether it's a quantity change, new items added, or customer information—it's important to notify the Norce adapter so that the changes are applied to the Norce Checkout order.
Once the buyer information is updated in Norce Commerce, we can call Update order in the Norce adapter. The Norce adapter will apply any changes to the order.
PATCH /api/v1/orders/<orderId>
X-Merchant: <merchant>
X-Channel: <channel>
Authorization: Bearer <token>
Host: <slug>.api-se.playground.norce.tech/checkout/norce-adapter200 OKIf we instead (or also) update the customer information in Norce Checkout, the following sequence will be triggered:
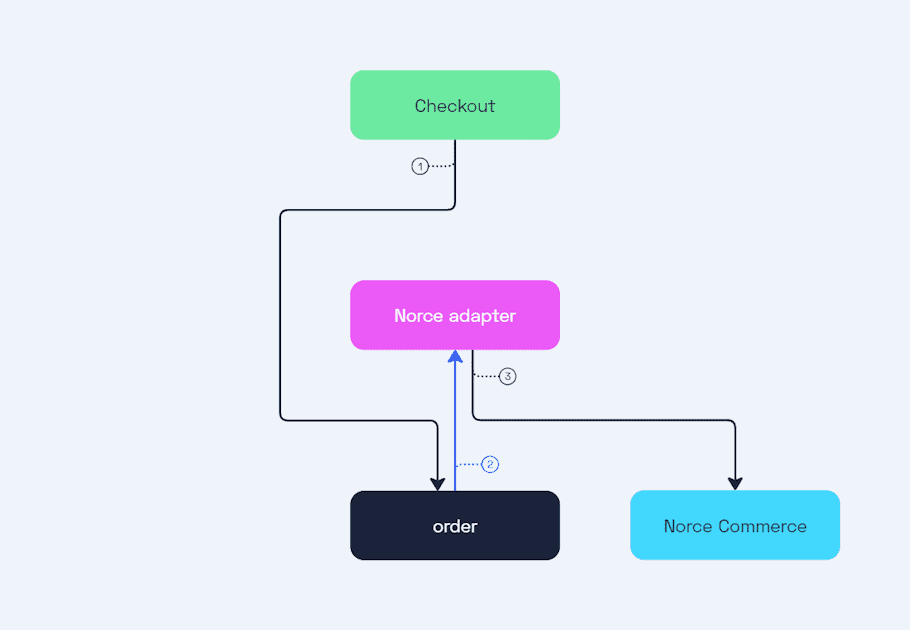
- The Checkout updates customer information.
- The Order service calls the Norce adapter customer change hook.
- The norce adapter updates the buyer in Norce Commerce.
PUT /api/v0/checkout/orders/<orderId>/customer/billing
X-Merchant: <merchant>
X-Channel: <channel>
Authorization: Bearer <token>
Host: <slug>.api-se.playground.norce.tech/checkout/order
Content-Type: application/json

{
  "givenName": "Henrikinho",
  "familyName": "Undulatsson",
  "streetAddress": "Odengatanvägen 12",
  "streetAddress2": "Lgh 1203",
  "postalCode": "915 20",
  "city": "Skellefteå",
  "country": "SE",
  "phone": "0701740612",
  "email": "henrikinho.undulatsson@example.com"
}200 OKCompleting the order
Now that we've progressed the order, we can complete it using the Non-PSP adapter.
POST /api/v1/checkout/orders/<orderId>/payments/<paymentId>/complete
X-Merchant: <merchant>
X-Channel: <channel>
Authorization: Bearer <token>
Host: <slug>.api-se.playground.norce.tech/checkout/nonpsp-adapter
Content-Type: application/json200 OKUpon completing the payment, the Non-PSP adapter will sequentially update the order's state:
- From Checkout to Processing .
- From Processing to Accepted .
- And finally, from Accepted to Completed .
As noted earlier, the Norce adapter contains a hook that triggers when the order transitions from Checkout to Processing, and a notification that is triggered when the state changes from Accepted to Completed.
Transition from Checkout to Processing
When the order status changes from Checkout to Processing, the following sequence is triggered (we'll skip the configuration step, as it's understood that adapters fetch their configuration):
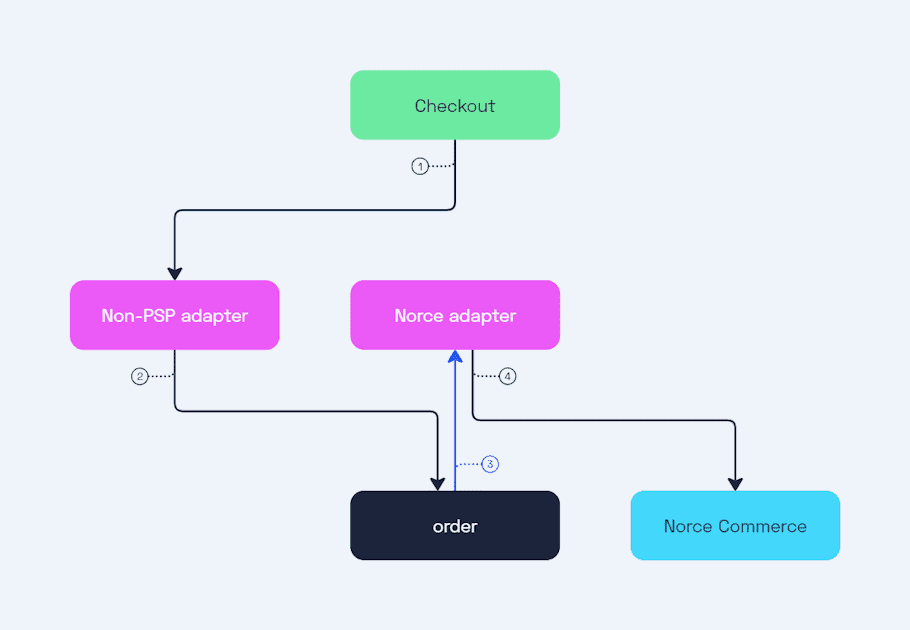
- The Checkout completes the payment through the Non-PSP adapter.
- The Non-PSP adapter updates the order state to Processing .
- The Order service calls the Norce adapter state change hook.
- The Norce adapter purchases the checkout and validates the Norce Checkout payment method in Norce Commerce.
Transition from Accepted to Completed
Once the order status changes from Accepted to Completed, the following sequence is triggered:
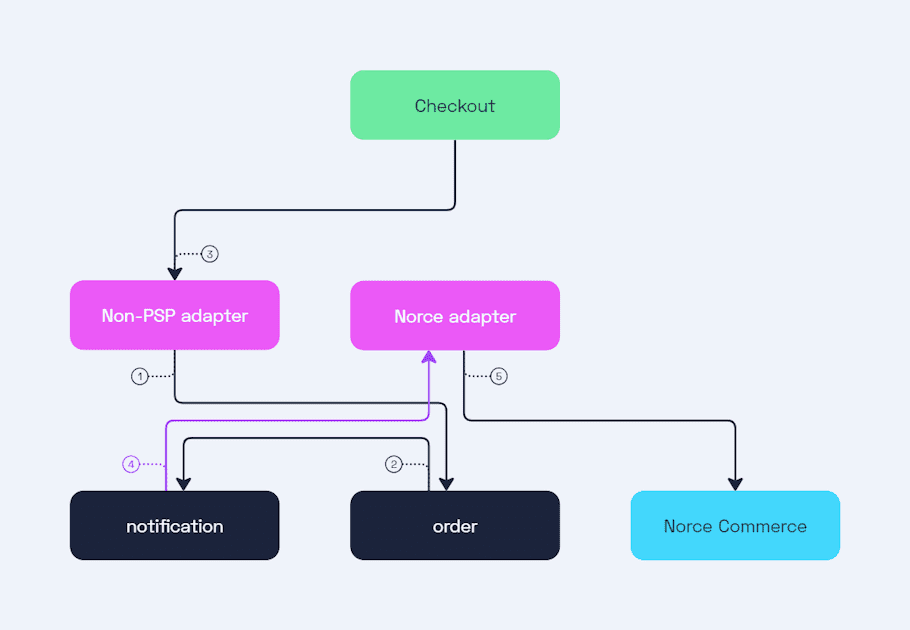
- The Non-PSP adapter updates the order state to Completed .
- While the Order service invokes the Norce adapter state change hook, it is immediately accepted by the Norce adapter, and the order change is committed. A notification is queued for further processing.
- The Checkout receives a response that the payment was successfully completed.
- The Notification service processes the queued notification and invokes the Norce adapter.
- The Norce adapter completes the payment in Norce Commerce.
Finally, the order will appear in our Norce Commerce admin interface.
Next Steps
In this tutorial, we configured the Norce Adapter, created a Norce Checkout order from a Norce Commerce basket, and completed the order using the Non-PSP adapter.
- We set up the adapter, prepared a basket, and created an order in Norce Checkout.
- After adding a payment, we updated the item quantity and customer details, while examining how hooks and notifications manage order changes.
- Finally, we completed the payment, progressing the order through the Checkout , Processing , Accepted , and Completed states.
Next, we'll explore the Klarna Checkout adapter for an alternative payment integration.